Here are some instructions for how to add (submit) your book reviews/projects/summaries. You will be creating what in WordPress is called a page. Pages are very similar to “posts” except pages don’t appear in the blog-like flow on the front page. Posts are what you’ve been creating each week when you read the assigned readings and commented on this site. This assignment involves creating a Page. Pages are intended as stand-alone webpages within this website. For example, when you go to the “Assignments” or “Readings” tabs, you visit a WordPress page. It’s actually pretty easy and you don’t have to know any fancy web programming or html coding to be able to create very readable, nicely styled posts. I’ve included some screen shots of what you’ll see along the way. I’ve also annotated those screen shots to make it easier. If you click on a screenshot a larger image will appear.
First, I’m going to assume you’ve read your book and know what you want to say. Next you have a choice: you can write and edit directly in WordPress, including saving drafts and revising them before publishing, — or — you can write your review in a word processor or text editor (such as MS Word or Notepad). Both ways work. You will want to pay close attention to the TIPS below if you want to copy from another word processor into WordPress.
Step 1. Login to compsys16.econproph.net.

After login – find the “new” menu, select “Page”
Login like you always do when you get ready to post. Once you are logged in, you’re familiar with the blue-posting box that appears – that’s how you’ve been posting. But you may not have noticed that once logged in, there’s a black bar across the top of your screen. On the extreme left it has the WordPress logo and “My Sites” and on the extreme right it has your user name. This black bar is called the Admin Bar.
Step 2: From the black Admin bar across the top, click on “New ” and then “Page”
Once you click that New –> Page from the black admin bar across the top, the screen will refresh and take you to the “Dashboard”. The Dashboard looks very different from the regular site. I don’t recommend doing Dashboard work like creating your page from a phone. I suggest using a regular computer screen – it’s easier to navigate.
Specifically, you’ll be at the “Add New Page” screen. From here it’s pretty easy and relatively obvious, but it’s still worth reading the rest of these instructions.
Step 3: Create your new Page content.
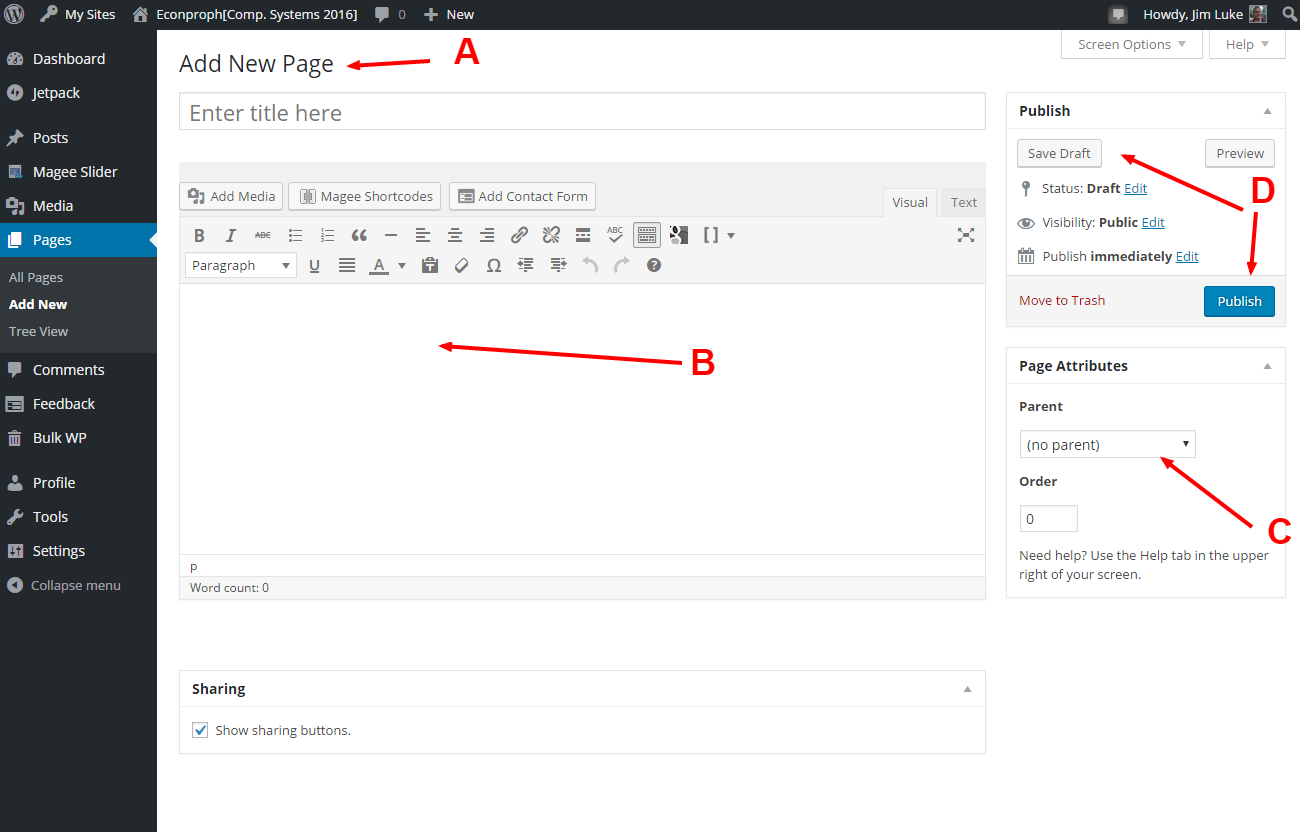
screen shot of create page screen
You should now be looking at the “Add New Page” screen. This is where you create your new post for your book review or essay.
There are 4 things you MUST do on this page. I have numbered them in order in the screen shot to the right. They are:
- Type in your title. (A on the screen shot) Any title that you find descriptive is OK. You do not have to worry about formatting. WordPress takes care of that. Just enter your selected text for your title.
- Enter the body of your page. (B on the screen shot) Use the big text area to enter your text. There’s more information in Step 4 below, but basically it works like any word processor. Just type. The enter key (hard return) creates a new paragraph. For the most part, WordPress takes care of formatting things like font selection, font size, etc. All you have to change or specify is any special formatting such as bold for a single word or an indenting or bullets.
- Identify your Page as a Book Review and locate it properly. (C on the screen shot) On the right side of the screen, there’s a box that says “Page Attributes”. It has a drop-down menu labeled “Parent”. Be sure to click on the drop-down menu and select “Project Pages”. This will greatly help me and help others find your Page quickly.
- Publish it. (D on the screen shot) Clicking on the blue Publish button in the upper right will make it visible to everybody else. If you aren’t finished yet, click on “Save Draft”. You’ll be able to come back and revise/finish it later. If you are uncertain, click on the “Preview” button first to see how it would look.
That’s it. You’re done. Congratulations, you are now a “blogger” (that’s your class posts) and a webpage creator!
TIPS: Editing your post.
- Copying from word-processor or text-editor. As I mentioned earlier, there are two ways to get stuff into your post. You type and edit in WordPress itself which is what I do, or you can copy-and-paste from another program like MS Word or Notepad. If you copy from another file, it is best to copy what you want in the other program. Then switching to WordPress, click where you want to insert the copied material and use ctrl-V to paste it.
- Don’t add much formatting in Word or a text-editor. WordPress will take care of font sizes, font styles, etc. Just worry about the words, paragraphing, etc.
- Quotes: If you are quoting something, turn on the quote styling by clicking the ” button. See A in screenshot.
- Copying from the Web: If you are quoting and copying a segment from another web page, just copy the selection you want in your web browser. Then click in the text box in WordPress and type cntrl-V. Be sure to style it as a quote.
- Make Links: When quoting or otherwise referring to something on the Web, it’s a good idea to link to it. Highlight the text you want to become a link, then click the link button and fill in the blanks.
- Jazz up your post.
- Add an image or picture. Click the little camera icon next to “Upload/Insert” just above the toolbar and to the left. A dialog box opens. Choose a tab depending upon whether you want to upload or simply specify a URL on the Web and have WordPress get it. Follow the instructions, answer the settings (most of the defaults are OK), and be sure to finish by clicking Insert.
- You can embed a Youtube video if you think one is relevant. Youtube is now incredibly easy. Just enter the URL for the YouTube video on it’s own line in your page. WordPress will take care of getting the info and creating and embedded video player in your post. If you have a source of video or media or graphic from elsewhere on the Web and you can’t figure out how to insert it or embed it, email me with the URL of the item. I’ll help you.
That should do it.
Saving and Editing Later
If you want to save your work as a draft and not publish it yet, you can do that by clicking “Save as Draft” instead of “Publish” in Step 3.4 above. Then, later when you want to come back and edit it again, you go to the dashboard – the area where you enter a new page is part of the dashboard – the “admin or back-end of the website”. To do this, login on the home page of the website. On the black admin toolbar at the top, roll your mouse over the name of this site, “Econproph[Comps.Systems 2016]”. A link to “Dashboard” will appear. Click it. When the Dashboard appears go to PAGES >> All Pages on the left side menus and click. A list of your pages appears. Click edit on the one you want to edit. Find yours and click on it to edit it. You’ll be back to step 3.